Hi All! Its long since I have offered my readers something technical to go through. The wait is over and its really worth it. We will dive into cloud today. I will be explaining you in details how can you use one of the popular service of AWS known as Athena.
The blog is written keeping in mind that you have little or no idea about any AWS service. Albeit, a tad bit of knowledge on S3 service will help you to understand the blog better.
Lets take an use case before proceeding ahead. Suppose we have a csv file that contains some data into it. lets say it has details of Employees in a company. I have another csv file that contains details of the department of a company. Now, I wish to do some operations that needs data from the employee file and department file to be joined. e.g to get max salary of employee in every department etc. If we had the same data in 2 tables in a database, things had been simple. right? We could have just joined both the tables, grouped on department ids and found the max of salary. Since I have the data in file, now the same work becomes more tedious. Or perhaps it was tedious because its really very simple with Athena now.
Athena is a service used to run SQL queries against S3 deliminated text files without the need of a installed Database. Being server-less it is inherently scalable and highly available. You just need to pay when you use it.
The above diagram shows how Athena works. Its closely works with another AWS service knows as S3. The files to be queried needs to be stored at S3. The query results are not only displayed in the Athena GUI panel but is also stored in the defined S3 bucket path. All the metadata(information about the data) is stored in Athena Data Catalog.
I have the data set to be used ready with me. Below is data from dep.csv file containing dep_id, dep_name
01,DI
02,BIG DATA
03,BI
The emp.csv file contains name, salary, dep_id
Suraj,100000,01
Rajbikram,200000,01
Koushik,170000,02
Sudipta,100000,02
Pritam,400000,02
Sourabh,150000,03
Nabarun,190000,03
Its time to make our hands dirty now.
1. Create a S3 bucket and Object
a. Login to AWS and select s3 service. You can see I already have a bucket created with name athena.sj . However, for your convenience of understanding I will create a new one. By clicking in the Create Bucket button.
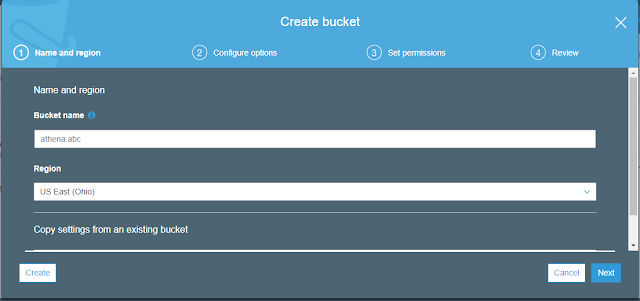
b. Enter the bucket name and don't tamper with region now. I will get back to explaining regions later. Click on Create button to create your bucket.
c. You can see that my new bucket with name athena.abc is created. Now lets open it and create 2 folders inside employee and department. One for my emp.csv file ad another for my dep.csv file.
d. So I have both my folders created now.
e. Lets upload the files now to the respective folders. Enter into a folder and click on upload. A pop up will appear then upload your file there.
f. Repeat the same for employee file as well.
--------------------------------------------------------------------------------------------------------------------------
With this we are done with the S3 part.Now lets move to Athena console which kinda looks like this.
default is the name of the default database. You can also see some of my tables created under that database.
2. Create a metadata database
a. Creating a table is easy here using Create Table Wizard. Click on create table link beside the Tables label. Then, click on from S3 bucket data.
b. On the next page you would need to enter the table name and the location of the file to be queried. You can also create a new database or use an existing one. In the example I an using the existing database default.
In the table name field I have entered emp
In the Location of Input data set field I entered the address of my bucket that is s3://athena.abc/employee/ .
It is of the format s3://bucket_name/folder_name. Once done click on next.
c. On the next step select the data format of the file. In our case its a CSV file.
d. Column names and their type are to be added now. In my emp.csv file the columns are name, salary and dep_id with string, int and int type respectively. If you have a data set with multiple columns then Athena also has a bulk upload option to ease your task of manually adding columns and types.
e. Then on the next step click on create table. Post this you can see a DDL generated for you.
f. Click on run query to execute the DDL and you table will be created. You might be asked to select a storage area to store the output of a query. Just enter a bucket path where you wish to store you output.
g. Lets preview the data in my emp table now. You can do it now using a select query.
select * from default.emp;
h. The same thing is done for dep.csv file as well.
Tada! so we have both the emp.csv and dep.csv data into emp and dep tables. So lets try to achieve our goal which was to get max salary of employee in every department.
select dep.name,max(salary) max_sal_in_dep from default.emp join default.dep on emp.dep_id=dep.dep_id group by dep.name;
Is the query which is expected to give me the desired result. Lets check!
So, It worked. The possibilities are immense now.
Hope the blog helped you understand Athena. If you want me to dive into any other AWS service. Do comment below. Also share this with other technocrats!


Comments
Post a Comment